
Documenting the process of designing analog instruments and reverse-engineering vintage hardware + more.
Viser opslag med etiketten analog. Vis alle opslag
Viser opslag med etiketten analog. Vis alle opslag
lørdag den 24. juli 2021

onsdag den 11. november 2020
Eurorack Modules: DIY CRT scope
Hi guys, I know it's been a while.
I've fallen behind with updating my blog although I've been active on my facebook and my YouTube pages. Sometime back in 2018 I decided to switch to eurorack as my DIY stuff
required a lot of maintenance. I uploaded this video of my current
studio recorded with an old crappy camcorder where you get the general
idea of the setup:
I've bought several weird modules which sort of fits into my previous aesthetic with vero test-boards, bendable CMOS-chips, tube-amplifiers, CV-controllable tape-player, nixie tube counter and a custom built CRT-scope module I designed in collaboration with a tinkerer from Belarus under the name Ghetto Hacker.
I stumbled upon this Ghetto Hacker guy where I saw he'd built a module for eurorack with a small CRT from a camcorder, used as an oscilloscope. I paid him for his time and skills to make me one and the result is really amazing, sturdy 3d-printed arm to hold everything in place and a nice black front plate.
Here's some video:
Ghetto Hacker's finished work:
Testing module in my own case:
And here's some pix from the build:
|
|
|
||||||
|
|
|


If you're interested to see what I'm up to, go follow me on YouTube (Dani Dogenigt) or find Dogenigt on facebook. I think I am going to give a guided tour of my eurorack system so you can see some of the modules in action. Please take care and see you soon!
torsdag den 11. august 2016
Hi guys, currently I am on my holiday so just taking it all in and I've been a bit away from the workbench.
Here's a little catch-up.
My wooden modular project is slowly pacing away, the first module - the main console - has got its frontplate in 5mm clear acryllic mounted with the TVs steadily fixed on the little wooden shelf.
The idea is to have the monitors as in kind of a cockpit/main console where I can monitor various things like input voltage, temperature in the case, run time and date etc. via my Arduino Uno + TellyMate Shield.
The left CRT has been made into a TV-oscilloscope for the main out (stereo) signal.
Here's a little catch-up.
My wooden modular project is slowly pacing away, the first module - the main console - has got its frontplate in 5mm clear acryllic mounted with the TVs steadily fixed on the little wooden shelf.
The idea is to have the monitors as in kind of a cockpit/main console where I can monitor various things like input voltage, temperature in the case, run time and date etc. via my Arduino Uno + TellyMate Shield.
The left CRT has been made into a TV-oscilloscope for the main out (stereo) signal.
|
|
||||
|---|---|---|---|---|---|
|
|


onsdag den 18. november 2015
Hacking a Discman into a glitch machine!
A while ago I came across a female hacker/circuit bender under the name r20029 who managed to turn an obsolete Sony Discman into a crispy glitch machine! She baptised it the 'Sony Discbitch' :-)
I managed to hack my own CD player. Here's what it sounds like:
What the hack does is getting access to the anti-skip IC which stores a couple of seconds of audio on a RAM chip. The position of this chip varies from player to player so look up the name of the chip until you find the anti-skip IC. The pins A0 through A9 are DRAM adress pins. If we connect these pins together, we can confuse the machine to get glitchy playback and weird artifacts and noise.
After damaging a couple of CD players I finally managed to solder wires onto the tiny surface mount pins. Hot glue is your friend to make sure you don't accidently pull the wires off the pins when you've soldered it all together.
I think this mod holds great potential for a future module for my modular setup. Maybe have a couple of sample CD's with different material suited for glitchifying.I managed to hack my own CD player. Here's what it sounds like:
What the hack does is getting access to the anti-skip IC which stores a couple of seconds of audio on a RAM chip. The position of this chip varies from player to player so look up the name of the chip until you find the anti-skip IC. The pins A0 through A9 are DRAM adress pins. If we connect these pins together, we can confuse the machine to get glitchy playback and weird artifacts and noise.
After damaging a couple of CD players I finally managed to solder wires onto the tiny surface mount pins. Hot glue is your friend to make sure you don't accidently pull the wires off the pins when you've soldered it all together.
 |
 |
torsdag den 6. august 2015
DIY Modular #1: Wooden case and CRT-monitors.
Hola amigos y amigas! :-)
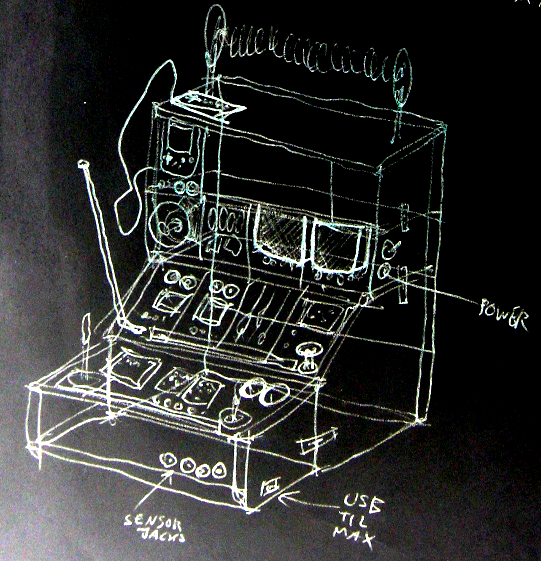
Besides enjoying a long summer holiday, before starting on my master's degree in electronic music, I've been rethinking my entire setup and decided to abandon the idea of having lots of separate boxes which I have to arrange and connect for every concert and instead jump on the modular wagon but with my own standards and designs. (no "eurocrack" ;-P ) I am going to design and build every module from scratch and include some different and unique modules and parts and try different methods of circuit designing. The frontplates are going to be transparent so all the insides are visible, which adds an extra dimension the the machine - it will be an work of art, from circuit to interface. |
 |
I wanted something organic and easy to work with so I went with wooden frames for the cases and for the front- and backplates I chose transparent acrylic glass as it's neat to be able to see the insides of the machine. I will put a lot of emphasis on the aesthetics of the circuits, parts and components because of this. For attaching the acrylic frontplates I am going to use an alu-rail with rectangular 'slide nuts' as the width of the modules will vary.
In the future I want to be able to expand with further identical cases on top so I added a mechanism for attaching the frames to each other. The drawing above shows my vision of what the machine will ultimately end up looking like.
Some snaps of the cases / frames:
|
|
|


|
|
|


The first actual modules will be a 'terminal' with a green-monochrome CRT TV. It will receive a video signal from an Atmega328 generating simple text strings with data such as the temperature inside the box, total run time, date and time and a lot of other stuff.
Next to it another CRT TV of the same size will display the master stereo output as a simple oscilloscope. Beneath the TV I will install two analog VU meters with a nice warm backlight as well.
|
|
|
||||||
|
|
|


The plan is to mount front plates in front of the TV's and have all the knobs and in/outputs controlling the TV and the terminal.
For labels I want every front plate etched with a CNC router (or just by hand?) and then edge-light it with an LED-strip installed beneath the acrylic. A test looks like this (scrap acrylic with scratches):
|
|
|


onsdag den 13. maj 2015
Debut album released on DIY audio player
For my bachelor-degree project I decided to pile together various recordings and compostions collected during the past years I've been under my alias Dögenigt and make an album.
For a long time I'd been thinking of an alternative to the digital release or vinyl and what have you and I discovered a tiny circuit based on a miniature arduino-like chip (ATtiny85) which can be programmed to read lossless quality sound files from an SD-card and play them (in 44.1 kHz 16 bit) via the PWM pins.
So I decided to go ahead and build the circuit into a small audio player to be built into some casing as my album and have the project and journal revolve around that.
I've been working on the project for the past couple of weeks - it's all in the papers I wrote.
Link to the paper in danish: http://data.xn--dgenigt-q1a.dk/DIEM/opgaver/BA3-Bachelorprojekt.pdf
I tried to translate into english but failed to do so. Let me know if you have success!
Images from the project:
Wave-player based on ChaN's circuit and code:
Runs of 3.3V and outputs sound directly to jack output in 44.1 kHz 16-bit sound. So far, only mono as more digital pins are needed. The PWM-outputs on the ATtiny85 each create an 8-bit signal, when 2 are added together they make 16-bit. For stereo 16-bit sound 4 digital pins are needed. We didn't have enough time to do this but I know of a guy who did it with an ATmega328.
Finalized player with batterypack, speaker and SD-card.
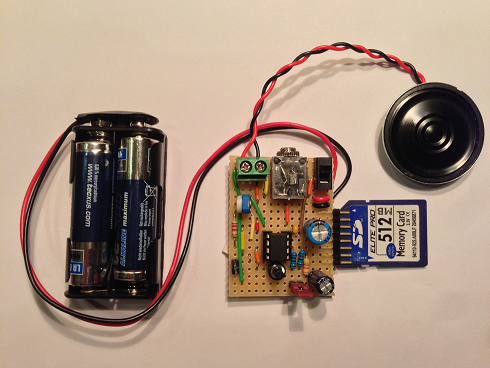
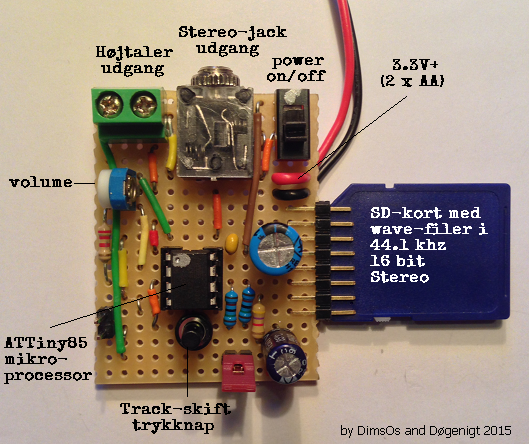


The album is already online on my bandcamp as digital download but in the future I will have the release available on this platform as in the pictures above. The whole album can be bought for $10 and of course streamed for free. All the tracks are made with my homemade gear. Enjoy!
For a long time I'd been thinking of an alternative to the digital release or vinyl and what have you and I discovered a tiny circuit based on a miniature arduino-like chip (ATtiny85) which can be programmed to read lossless quality sound files from an SD-card and play them (in 44.1 kHz 16 bit) via the PWM pins.
So I decided to go ahead and build the circuit into a small audio player to be built into some casing as my album and have the project and journal revolve around that.
I've been working on the project for the past couple of weeks - it's all in the papers I wrote.
Link to the paper in danish: http://data.xn--dgenigt-q1a.dk/DIEM/opgaver/BA3-Bachelorprojekt.pdf
I tried to translate into english but failed to do so. Let me know if you have success!
Images from the project:
Wave-player based on ChaN's circuit and code:
Runs of 3.3V and outputs sound directly to jack output in 44.1 kHz 16-bit sound. So far, only mono as more digital pins are needed. The PWM-outputs on the ATtiny85 each create an 8-bit signal, when 2 are added together they make 16-bit. For stereo 16-bit sound 4 digital pins are needed. We didn't have enough time to do this but I know of a guy who did it with an ATmega328.
Finalized player with batterypack, speaker and SD-card.

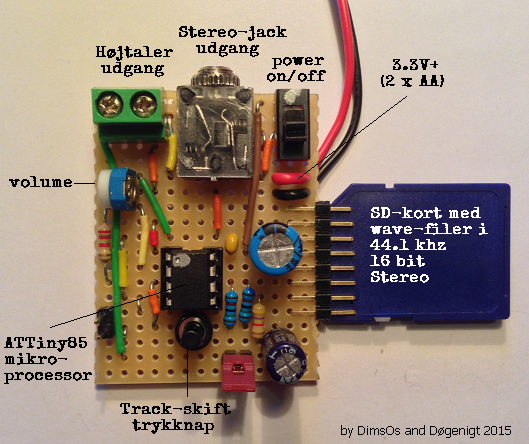
Simple version of the player with no jack output but screw terminals instead for power and output.

Player cased inside VHS-cassette :-)

ChaN's (simple!) circuit

The album is already online on my bandcamp as digital download but in the future I will have the release available on this platform as in the pictures above. The whole album can be bought for $10 and of course streamed for free. All the tracks are made with my homemade gear. Enjoy!
mandag den 16. februar 2015
Dögenigt @ Mayhem: Noise Convention #1, 18/10/2014
I just received this footage from the Noise Convention last year on Mayhem, Copenhagen. The video is not very long but there's audio recording from the mixer of the full concert if anyone's interested.
fredag den 16. januar 2015
Aristoteles Logic Synth Update #4: Logic Gates
I thought it was time for building the next module for dear Aristoteles, my 'lo-fi logic synth project' so I did the logic gate module which consists of 8 AND gates with 2 inputs and an LED for the output. The truth table on the right describes how the gate will behave: the output only goes high (1) when both inputs are high. The result is a very simple form of amplitude modulation, or it can be used to control the path of signals from the other modules with counters or LFO's, you name it.
The video below speaks for itself.
|
 |
In the video I demonstrate the effect of the 3 different frequency ranges on the oscillators: LFO range signals are good for 'letting through' audio range signals at a certain rate for "beep beep beep beep" sounds. 2 audio range signals will generate complex pulsating modulations and beatings when adjusting the pulse width.
Setting the range to the high pitched setting on both oscillators will generate classic vintage radio-like modulation squeeks. I also tried using the 'octave divider module' for one of the inputs which has its own unique sound.
I chose to have all the logic gates as AND gates. For a long time I was in doubt about wether to have a pair of XOR or NAND gates just for the hell of it but I could not find a good reason as they don't do much sound-wise where as the AND gate is so clear in its function and I want to be able to make complex signal paths with counters, dividers, random clocks and all eight oscs - all controlling each other through the gates.
Setting the range to the high pitched setting on both oscillators will generate classic vintage radio-like modulation squeeks. I also tried using the 'octave divider module' for one of the inputs which has its own unique sound.
I chose to have all the logic gates as AND gates. For a long time I was in doubt about wether to have a pair of XOR or NAND gates just for the hell of it but I could not find a good reason as they don't do much sound-wise where as the AND gate is so clear in its function and I want to be able to make complex signal paths with counters, dividers, random clocks and all eight oscs - all controlling each other through the gates.
I am already starting on the 10-step counter 'cause I cannot wait to have each step 'open' a unique oscillator with different frequencies!
The circuit is very simple, I basically just wired the in- and outputs straight to the 4081 but attached 100K resistors on each pin to prevent static electricity from the end of the wires going into the chip when patching.
LED's are controlled by transistors as always to prevent voltage dropping on the outputs.

The circuit is very simple, I basically just wired the in- and outputs straight to the 4081 but attached 100K resistors on each pin to prevent static electricity from the end of the wires going into the chip when patching.
LED's are controlled by transistors as always to prevent voltage dropping on the outputs.
UPDATE:
I had my brother a.k.a. SNU over and he fell in love with the new module which resulted in hours of wiggling.
Here's a a little peak of the tweak :-)
onsdag den 7. januar 2015
Terrestrial Signals III Live concert @ DIEM Elektro 'Pulse'
A late happy solstice to all of ye - I have been ind bed for most of the holidays, guess my body and mind was in need for some rest, it's hard work wanting to do you own thing and the following concert you are about to witness required a lot of planning and soldering.
I found out I was booked to play at the next of DIEM's obligatory student concerts 'DIEM Elektro' - this specific concert was called 'Pulse' so I prepared some pulsating light-controlled rhytms with a hacked monotron, using only the nice korg filter with a photoresistor, clock-synced to the notorious MicroWaveSampler by my Clock Box. I included my electromagnetic plasma ball synth described in the post below. I was pretty content with the outcome although some of my gear failed a bit, including my little TV-to-sound device. To much noise on the line to gain it. Anyways, please check out the video - it was shot by my brother Alec Sander and with his GoPro Hero camera attached to my head so you get the P.O.V. close up shots from my perspective. Enjoy!
I found out I was booked to play at the next of DIEM's obligatory student concerts 'DIEM Elektro' - this specific concert was called 'Pulse' so I prepared some pulsating light-controlled rhytms with a hacked monotron, using only the nice korg filter with a photoresistor, clock-synced to the notorious MicroWaveSampler by my Clock Box. I included my electromagnetic plasma ball synth described in the post below. I was pretty content with the outcome although some of my gear failed a bit, including my little TV-to-sound device. To much noise on the line to gain it. Anyways, please check out the video - it was shot by my brother Alec Sander and with his GoPro Hero camera attached to my head so you get the P.O.V. close up shots from my perspective. Enjoy!
I have a line of projects planned for this year, as I am writing my bachelor project which I think will focus on alternative media for releasing album material, more to come on that. After the last concert I finally chose to sucumb to the idea of a modular system instead of all these seperate modules which has to be wired together on set, it's too much hazzle every time I need to set up for a concert so now I will jump into building a complete modular system with the same principles used so far: analog means of sampling, tape delays and quirky little circuits. Stay tuned!
Lot of love, Dogenigt
fredag den 5. september 2014
Aristoteles Logic Synth Update #3: Divider (simple)
The Aristoteles 'Lunetta' synth project is slowly but steadily going in the right direction. Here's the first of the two 4040 divider modules, demonstrated in the vid below.
 |
| Here's a scheme for the willing - simple and self-explanatory! |
To explain this simple circuit in a simple way, it's taking any clock output from the other modules and counting 2^n times before setting the output HIGH - 2, 4, 8, 16 and so on - up to 2^12 times, that is 4096 clocks before setting the output high.
That's quite a division, so a high frequency is needed if one wants oscillations in the audio range. Otherwise it's great for turning audio range signals into LFO clocks. All in all, it's a very musical chip as it creates sub-octaves, which are relations of a factor of 2 to the input frequency.
I was flipping through Roads' Computer Music Tutorial one evening and began to read up upon the very first digital systems with flip-flop logic gates and discovered that the method of dividing down a master clock to acheive other tones is ancient! So-called 'divide-down tone synthesis' was discovered in 1930 so this method is almost a century old!

tirsdag den 12. august 2014
Compositions on Bandcamp
Hi lovely people! Hope you're enjoying your summer.
I've created a bandcamp store where you can get some of my releases in lossless format.
Some of the compositions might appear on a future debut album, which I intend to release online and on a physical medium which will be quite different from your typical CD/LP format.
Link to my bandcamp is found by clicking on 'Releases' in the top menu.
The latest track I've finished is called Plate Phonetics and consists of recordings of cuts and scratches on blank phono records which gives weird rhytmic patterns. On top of it I've added some tones with feedback oscillator (Derek Holzer's soundbox) and recording of my homemade string instrument.
The other tracks available so far, you might've heard on my soundcloud. They are 'Subtlle Visit' composed during a meditation and creativity workshop with Kim Cascone and 'Veins of The Robot' composed with Christina Kubisch during a workshop with her on DIEM where we brought her electromagnetic headphones in the city of Aarhus.
'Entraining Patterns' is made solely from homemade equipment: the wavetable synth, Vibrati Punk Console and passive ring mod. There's also a composition made with The MicroWaveSampler.
I've created a bandcamp store where you can get some of my releases in lossless format.
Some of the compositions might appear on a future debut album, which I intend to release online and on a physical medium which will be quite different from your typical CD/LP format.
Link to my bandcamp is found by clicking on 'Releases' in the top menu.
The latest track I've finished is called Plate Phonetics and consists of recordings of cuts and scratches on blank phono records which gives weird rhytmic patterns. On top of it I've added some tones with feedback oscillator (Derek Holzer's soundbox) and recording of my homemade string instrument.
The other tracks available so far, you might've heard on my soundcloud. They are 'Subtlle Visit' composed during a meditation and creativity workshop with Kim Cascone and 'Veins of The Robot' composed with Christina Kubisch during a workshop with her on DIEM where we brought her electromagnetic headphones in the city of Aarhus.
'Entraining Patterns' is made solely from homemade equipment: the wavetable synth, Vibrati Punk Console and passive ring mod. There's also a composition made with The MicroWaveSampler.
mandag den 30. juni 2014
The 'MAXIMUX controller': High-res controller for Max/MSP (Update #1)
Nerd Alert! My favourite g33k-buddies (Carl Dimsos and Gus the Friendly Giant) and I are at it again! For a while, we've been discussing ways to interact with Max in a fast and precise way. The project is going to be a controller in a suitcase, armed with an Atmega-chip and a MUX-shield which allows us to have 48 analog inputs speaking with the arduino! This will give us a 10-bit resolution on all analog readings which is suitable for controlling audio parameters in Max. I want to have a lot of different and expressive sensors and knobs n butts for varying the input voltages.
´

So far I have whole lot of scrap parts from old helicopter remote controls and sensors sensing touch, distance, humidity, light intensity, gyroscopic motion and a lot more.
I've also disassembled two flight simulator joysticks with their own respective D/A-converters, which gives me 7 more analog inputs with 16-bit resolution!
I decided to have this project be a classical aim for those who's spent decades creating music in front of a computer monitor: to have the laptop lid closed and have all the paramters transfered to the controller.
For receiving feedback from Max I am going to use a 16x2 LCD display, as seen on The MicroWaveSampler (another arduino project done with Dimsos) for getting the values from the inputs and the max-paramter assigned to it. But I wanted to be able to see a little bit more of what's going on inside so I found an arduino project called Chibimo which allows the user to have a 128x64 display as an external monitor. (only winXP, sorry)
I've already tested it out, narrowing my patches way down to 128 pixels wide to have it fit on the little screen. I will use a usb-numpad to skip around in the patch to show different parts on the LCD monitor. More to come! Stay tuned and thanks for following guys.
fredag den 23. maj 2014
Aristoteles Logic Synth Update #1: MIXER
Oh what a spring it's been! I was bedridden for about a month which really
zapped all my creativity and I've slowly recovered now to bring back my
mind on what is the icing on my cake of life: electronic gadgeting.
So just around New Years Eve I posted a picture of my newly assembled modular synth casing - no intestines yet though! But just before my bed claimed me for a minor lifetime, I was able to finish up the first and central part of the system: the 8-channel mixer with simple BP/LP filters + power supply.
Here's a demonstration of what I am talking about:
So the idea is that you have 8 channels in the mixer which are summed together after they've passed the filter circuit and the respective volume knob. When using stackable banana-jacks one might ask why bother with a multi-channel mixer; why not just stack 'em on top of each other and using passive resistor/diode mixing?
The problem for me was that mixing with just resistors would cause each output from every oscillator to drop in voltage and maybe cause instability with edge-detection in the chips they would enter - and diodes make distinctive modulation when used for summing. Which is why every output enters a diode, so it's still possible to mix signals together in a single mixer channel if one is running low on free channels. Other than that, diodes make sure that no cross-talk occurs if stacked for multiple operations.
Some pics:
So just around New Years Eve I posted a picture of my newly assembled modular synth casing - no intestines yet though! But just before my bed claimed me for a minor lifetime, I was able to finish up the first and central part of the system: the 8-channel mixer with simple BP/LP filters + power supply.
Here's a demonstration of what I am talking about:
So the idea is that you have 8 channels in the mixer which are summed together after they've passed the filter circuit and the respective volume knob. When using stackable banana-jacks one might ask why bother with a multi-channel mixer; why not just stack 'em on top of each other and using passive resistor/diode mixing?
The problem for me was that mixing with just resistors would cause each output from every oscillator to drop in voltage and maybe cause instability with edge-detection in the chips they would enter - and diodes make distinctive modulation when used for summing. Which is why every output enters a diode, so it's still possible to mix signals together in a single mixer channel if one is running low on free channels. Other than that, diodes make sure that no cross-talk occurs if stacked for multiple operations.
 |
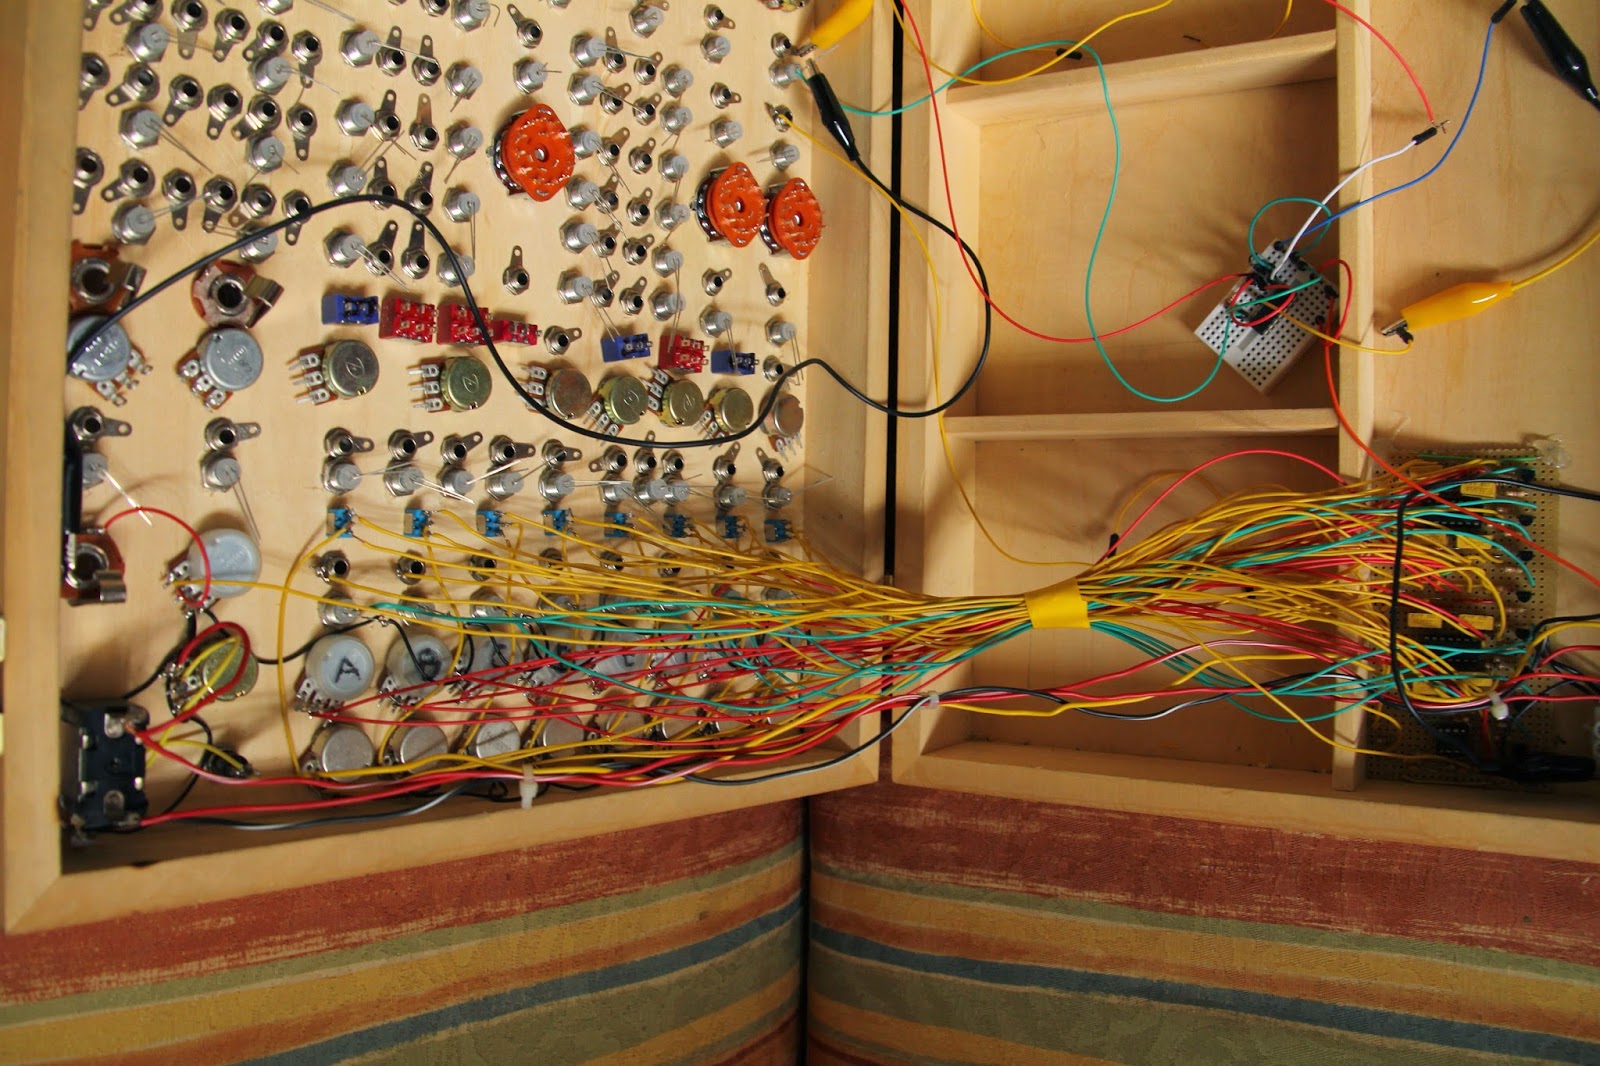 |
 |
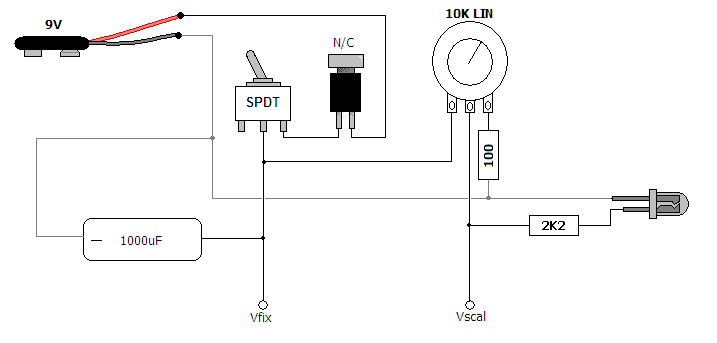
The power supply was super simple, just a power switch and momentary N/C
button to switch on and off and discharge the 470uF cap to get the
power starve effect. Starving only affects the CMOS-chips used for sound
generation, the mixer circuit isn't affacted by the variable supply
voltage.
I will discuss the other modules in future entries and here's some schemes for the willing.
I will discuss the other modules in future entries and here's some schemes for the willing.

|
 |
tirsdag den 21. januar 2014
Greeting Card Sampler Boxed
I finally got to finish up my project seen in this previous post: Voice Message Greeting Cards turned into Lo-Fi Sampler. It's the 'voice message recordable greeting card' I hacked into a small looper with playback speed bend, now in a neat little encasing I found in a thrift shop. I think it's a intercom from the 70's, quite nice.
The video shows the features which are: potentiometer for varying the playback speed, switch for selecting loop mode, red button on the side is for restarting the device, which re-triggers the message, switch for selecting between the inputs - electret mic or input jack, jack for sending output to an amplifier and in the bottom are two banana jacks which allows you to control the device with a vactrol or light sensor, or any other resistive sensor :)
The video shows the features which are: potentiometer for varying the playback speed, switch for selecting loop mode, red button on the side is for restarting the device, which re-triggers the message, switch for selecting between the inputs - electret mic or input jack, jack for sending output to an amplifier and in the bottom are two banana jacks which allows you to control the device with a vactrol or light sensor, or any other resistive sensor :)
 |
 |
 |
I had a very nice day at the FabLab's Maker's Day in Copenhagen, where I held a small symposium and a koncert with my current setup. One of the guys from CEO Bendorama who also played, got a recording of my concert - which includes the Greeting Card Sampler. (Thanks John!)
Abonner på:
Opslag (Atom)