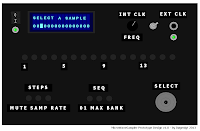
It is with great joy I am able to present to you: our dearest little newborn, The MicroWaveSampler.
An Arduino/Adafruit WaveShield-based 'Lo-Fi' Sampler with 16-step sequencer, preset function and external clock.
A project between my best g33k-buddy Carl @ DimsOs and I, which has been underway for a year.
We chose to call it MicroWaveSampler because it's a Microprocessor-driven Wave-sound Sampler.
Here it is in action, bellow we'll dive into the intestines.
I bought the Wave Shield some years ago and always wanted to make some simple sampler from it - I was thinking something very mechanical with rotary switches but as Carl made me aware of, the ATMega328 IC holds great potential for internally taking care of all sequencing and triggering of the samples on the card.
This awareness was the first step on the path to creating a fully functional sampler with the arduino. It turned out that we had to be very creative not only with the programming but also physically and circuit-wise, making the most of the fairly limited microprocessor IC. On the layout below, you can see the physical concept of the constellation:
So the brain of the game is of course our microprocessor, the Atmega328. It reads the WAV-files from the SD-card. We have a GUI in our little 16x2 LCD which shows our 16 steps/samples on the bottom line, each soundfile on the card is assigned a unique ASCII character, and since it's a chinese LCD we're using we have 185 symbols available (minus the ones we are using for common indicators etc).
For selecting steps and step menus (functions) we've built arrays of pushbuttons going through R2R-ladders, which means that each button sends a unique voltage to one of the AIN's on the atmega. The video shows how this is implemented but you select the step you want to edit and set the sample #, the sample rate and muting
 |
| Stripboard layout |
There's a knob for adjusting the internal clock (metronome) speed and one can switch to the external clock to syncronize with other devices. We've implemented a little button in the lower right corner for manual clocking if one doesn't have his Clock Box at hand.
Last but not least, the microprocessor sends the data to the DAC, which converts it to analog signals, amplified and sent to the audio jack.
Actually we wanted to have the everything on a single stripboard, but as I already had my Wave Shield soldered up, we decided to use that and make pin headers for the shield which is nice because it saves quite a lot of space on the board. To have easier acces to the buttons while programming and testing we mounted everything in a cardboard test-box which made it look pretty sweet and silly :-)
|
|
|
Now when the intestines where firmly put together, we could start experimenting with the software. It was without any doubt the most thrilling part of the whole process. To invent a small program for the machine and watch Carl code away for hours and hours. I am quite novice-level when it comes to programming so it was really a gift to have a skilled programmer design the brain for the device from my ideas. I would lay in bed before going to sleep getting new perspectives on how to implement the features needed and write them down on paper to show him so he could get an idea of how I wanted it to be.
The code will be available in the future, it still needs some polishing before it's ready for the public.
|
|
|
|
|
|
In the future we plan to make a version 2.0 - the design will be quite different, not so unorthodox as this one. If everything goes right, we will be able to provide DIY-kits with these. I'll let you know!
As before-mentioned, the code will be up soon, I will update this thread when the time comes.
Feel free to write us, comment and share!
UPDATE October15h, 2013:


